HTML for Absolute Beginners, by Jon Storm.
Go to : next (links);
previous (the <FONT> tag);
Beginner's HTML Index;
Jargon dictionary;
Ultraspace;
Jon Storm.
Using images
 One of the great things about webpages is the ability to display pictures. The basic command for this is very simple :
<IMG SRC="yourgraphic.jpg">
Put the command where you want the graphic to display, and that's all there is to it. Well, almost.
It is extremely important that you type the filename in your command exactly as the file has it. Although Windows doesn't care if you put Fred.jpg when it's actually fred.jpg, webservers do, and won't display the file unless you have it exactly right. This is a very common mistake and often causes beginners a lot of frustration, because the browser displays a picture quite happily on a page from your hard disk, but then doesn't display it when you call up the exact same page on the internet. So the case of the filename is crucial. On the other hand, it doesn't matter at all whether the tags and their attributes are in upper or lower case - either works equally well. I tend to put them in upper case to make them stand out better, but that's just personal preference.
Image alignment
 Although you can use IMG SRC on its own, in practice it is almost always used with several attributes. Like the heading command (<H1> etc), you can use the "align=" attribute, so to get a picture to display against the right margin instead of the left, the command would be :
<IMG SRC="yourgraphic.jpg" ALIGN=right>
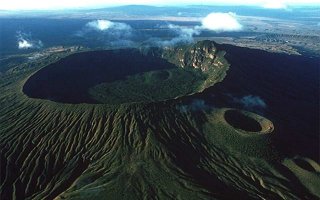
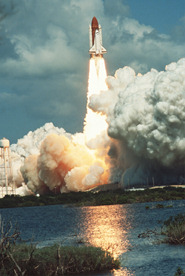
Notice that when you use align=right, as well as moving the image to the right it also causes the text to wrap around the picture, as with the space shuttle here, instead of starting at the bottom righthand corner of the image as it did with the crater, above. To get the text to wrap around an image on the lefthand side, use align=left - see the tree, below.
There are several other values you can use with align, but most of them aren't actually very useful. You can use "center" (note the spelling) or "middle", "top", "bottom" as well as one or two more obscure ones such as "texttop" and "absbottom". As an exercise, create a webpage with a long paragraph of text (just copy some from somewhere and paste it in). Then put in an IMG SRC command somewhere in the middle, and experiment with the various different value of "ALIGN=". The only ones I ever use are "left" and "right".
If you are using a lot of images and/or want more control over their positioning, IMG SRC's align attribute isn't the only way to do it. You can also position graphics and text by putting them in a table. Tables are a bit fiddly to use if you are writing your HTML by hand though, because they use a lot of tags, so I haven't included them in this set of tutorials. If you want to use tables, it's much easier to get an HTML editing program (see Tools for webpage making) to do the work for you.
It's particularly important when using images on a webpage to bear in mind that many of your visitors won't see the page exactly as you do. They may have their screen resolution set to a completely different size to you, or maybe they are browsing in a window and you usually browse full screen. Or they have their browser set to use bigger fonts than you. So that paragraph that just fits nicely alongside a particular image in your browser might not be long enough on someone else's. To get an idea of what I mean, try resizing your browser window horizontally a few times whilst looking at this page, from full screen down to absurdly narrow, and changing the font display size if you browser allows it; if you are feeling really keen, you could try changing your desktop to one or more different resolutions, too. Notice how the number of lines in each paragraph changes, and a given piece of text's exact position relative to a nearby image.
 To make sure that your next paragraph doesn't start until after an image, no matter how teeny your visitor likes their text, at the end of the paragraph you can use <BR> with the "clear" attribute : <BR clear=all> instead of <P>, as I have with this one, to make sure that the next heading comes after the tree rather than alongside it. (Some browsers will accept <P clear=all> instead of <BR clear=all>, but strictly speaking that's incorrect).
Making your webpage images "friendlier".
As you may have noticed if you have peeked at the source code for this page, there are three more attributes you should add to each picture to make your website more user-friendly, "width", "height" and "alt".
As you might expect, width and height specify the image's width and height, in pixels (every picture is made of little dots called pixels, short for "picture cell"). Images take a lot longer to download than text, and most browsers first draw a box where a picture is going to be. If you set the width and height attributes, the browser will draw the box the right size for the picture straightaway, and wrap the text round the box if applicable; if you don't, most browsers draw a teeny tiny square box, and then later expand it to fit when the picture has finished downloading. If your visitor is reading your text while waiting for the picture and you haven't specified width and height, when the box expands to fit the image the text will be suddenly pushed downwards out of the way, and your visitor will probably lose his place.
Most web editors will work out the width and height of a picture for you, and add the relevant details to the <IMG SRC> command for you. Notepad won't of course, being a very basic editor not especially designed for webpage-making, but almost any picture editor or display program will tell you what the size of an image is in pixels, and it's not hard to add them manually.
You can also resize a picture using the width and height attributes (just change the numbers), but this isn't a good idea unless you are also using the full-size image elsewhere on the same page. For one thing, if you get the proportions wrong your picture will be stretched out of shape - for example, the tree on the right is exactly the same image as the one above left, but slightly shrunk and viciously squashed by deliberately misusing the width and height atributes. For another, if you are making your picture bigger this way it will almost certainly look fuzzy; and if you are making it smaller, your visitor still has to wait while the full-size picture downloads, so there's no point. If you want to show a smaller version of a picture (often called a thumbnail), maybe with a link to display the full-size version if the visitor wants, use a graphics package to make a smaller version of the image, and use that instead.
The ALT attribute (ALT="some text") gives a text title to an image, which does several things for you. If you hover the mouse cursor over an image which has the alt attribute set, after a moment its contents will be displayed as a tooltip - try it on the pictures on this page. The contents of "ALT=" will also usually be displayed as a caption inside each image box (see previous paragraph) until it is filled with the image. And last but not least, some people set their browser not to display images at all : the blind, for example, or someone with a slow modem; or perhaps using a WAP phone, which currently can't display graphics at all. The ALT attribute gives such visitors at least a flavour of what your picture is about. You don't need to be too literal-minded about your ALT text, have some fun with it.
So to sum up, the full command to display the space shuttle earlier on this page was :
<IMG SRC="launch.jpg" WIDTH="185" HEIGHT="276" ALT="Going up..." ALIGN=right>
Choosing images
Of course, all this assumes that you already have a suitable graphic available. They are not hard to find, just go surfing. If you see a picture you like on a webpage, right click on it, choose "Save as..." from the menu, and save it on your hard disk. Easy.
Before you get too carried away, you do have to be aware of copyright. If you use someone else's image without their permission, they could sue you. So before you start helping yourself to someone else's entire catalogue, see what they say about copyright. The basic rule is that everything is copyright unless it explicitly says otherwise. Having said that, you will find that lots of people are happy to let you use their stuff for free, or in exchange for a link to their site. Try the NASA website. Loads and loads of great space pictures, all copyright-free, and they don't even want a link (they don't need it!) The only thing they don't allow you to use without special permission is their logo.
Another good source of free images is clipart CDs. There are any number available, with thousands of images, often free with a magazine or software package. The tree on this page is one of 12,000 clipart images on a CD that came free with PC Advisor magazine. Or if you have a scanner, you can create images for your website with that, bearing in mind that the same copyright rules apply to pictures in magazines and suchlike : you can't use them without permission.
You will probably find pretty quickly that you want to manipulate some of your images - change their size or format, for example. You will need some kind of graphics program for this, and unfortunately Windows Paint won't do because it can only handle bitmaps, which are unsuitable for web pages (see below). If you have a scanner, it probably has a fairly decent graphics program included with it as a freebie, otherwise you will have to look around for one. See the the section on Tools for making webpages for more about graphics packages.
Image formats
There are quite a few different computer image formats, and to use pictures on a website effectively you need to make sure you choose the right type(s). Why? Picture files are much, much bigger than text files, which is why the text of a webpage appears very quickly, but you usually have to wait for the images. The bigger the file, the longer it takes to download, and the more likely your visitor is to lose interest and go somewhere else.
Perhaps the most basic type of image on a computer is called a bitmap, which has the extension .BMP on a PC. Windows uses bitmaps for things like desktop wallpaper. In a bitmap file, each pixel is individually described in turn. This has advantages for some purposes, but is very bad for webpages because the files are very big, and so take forever to download - a full screen .bmp image at 800x600 is about half a megabyte, which would take several minutes even for a very fast modem to download. Another type of bitmap, which most scanners use, is the TIFF file (.tif), which are often absolutely gigantic - we're talking tens of megabytes here, for a high resolution scan. Totally out of the question for webpages (and don't email them to people, either!)
For an image to download at a reasonable speed, ie a few seconds, it needs to be compressed. There are two main formats for this, JPEG (pronounced "jay-peg", often written as JPG for short) and GIF, and most graphics packages can produce both. In general, use whichever produces the smallest file for the particular image.
 GIF (.gif) is best for pictures with 16 colours or less, such as drawings (the tree above is a GIF). Whereas bitmaps describe each pixel individually, GIF describes them in groups, loosely speaking : "First 25 white, then 10 green, then six brown..." sort of thing. This makes the file much smaller, but becomes ineffective if there are too many colours. Photographs are made up of thousands of dots of thousands of slightly different colours, so GIF isn't usually the best choice for them. It is highly effective for line drawings, symbols, logos and such, though.
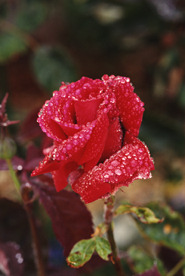
JPEG (.jpg and several variants such as .jpe and .jpeg) is a very versatile and effective format for multicoloured images and photographs in particular, dreamt up by the Joint Photographic Expert Group - hence the name. The crater, the space shuttle and the rose on this page are JPEGs. Unlike GIF and bitmap images, a JPEG makes an image smaller by throwing some of the information away, mainly by reducing the number of colours. The more you throw away the smaller the file becomes, and therefore the quicker the picture will display, but at the cost of making the picture a bit fuzzier. It's a trade-off between download speed and image quality.
When you create a JPEG image you have to specify the amount of compression, or in other words how much detail to discard. Experiment with different compression settings : some images can be savagely compressed without much apparent loss of quality, others, particularly if they contain text or other sharp edges, suffer badly at higher compression rates. Make sure you don't delete or overwrite your original images when creating JPEGS though (save them under a new name), because once you have created a JPEG by throwing some of your picture's information away, you can't get the lost detail back except by returning to the original. (This also means that blowing up JPEGs, ie making them bigger, usually doesn't work very well).
Whatever type of images you use, don't make them too big. A good rule of thumb is that anything bigger than 50K is too big. Big picture files might look great on your computer, but you're reading them off your hard disk. Don't forget your visitor has to download them, often via 56K modem or worse. If it takes forever he might just give up and leave. In practise most pictures don't lose much by being compressed down to 50K anyway, as long as their physical size (width and height) isn't too big. For example, the rose above is only about 24K.
Go to : next (links);
previous (the <FONT> tag);
Beginner's HTML Index;
Jargon dictionary;
Ultraspace;
Jon Storm.